Quick create button form customization – New D365 Sales Mobile App Navigation
December 05, 2022

Dynamics 365 Sales new mobile app helps the user to easily access information and take action – simply making their life easy. However, customization of “Quick Create Button Forms” on main navigation can be a bit tricky and don’t always give the desired results. When customizing “Quick Create Button Form” in the main navigation on the new d365 mobile app, many people are seeing fields that they did not add – In this technical blog post, I will help solve that. As a quick note, it is about required fields but let’s take it step-by-step:
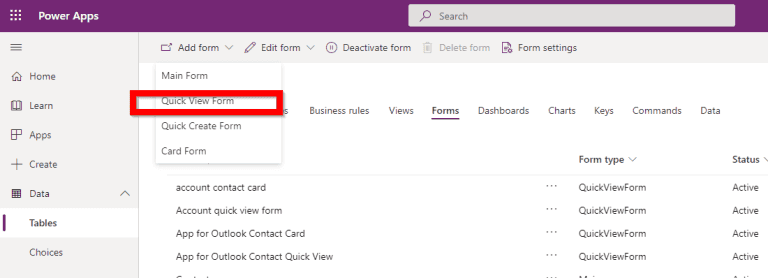
First, you need to define which columns/fields you want in the quick create form when selecting a table/entity on the mobile app using “Quick Create Button”. As written in the official doc article, it is done by creating form type: QuickViewForm to the entity/table:
Once the QuickViewForm is created with the columns/fields. You need to be aware that you most likely will see more columns/fields than defined in your Quick View Form, as in the example on the right; we can see a column/field called “Last Name” – however in the above form designer the “Last Name” column/field is not added to the form. Let me explain:
Required fields/Columns
Dynamics adds all columns/fields that are marked required in the table/entity to the form, if you don’t add them to the form yourself, they will show up anyway. You either have to add them to the form or change the business ruling so the columns/fields are not required.

Once your form is designed – you are ready – however, if you have multiple QuickViewForms you will have to set a form order. The QuickViewForms that you want to be the main form on the mobile app will be set first, in my case it is: “Contact Reference Panel”
| Form order | Form name |
|---|---|
| 1 | Contact Reference Panel |
| 2 | App for Outlook Contact Card |
| 3 | Contact quick view form on event team member |
| … | … |
In this example, the sales app will display information based on the columns/fields defined in “Contact Reference Panel” + required columns/fields if they are not already added to the form.
To illustrate how to set the form order please see the following screenshot:

Result
The screenshot of my mobile screen shows the columns/fields when creating a new record for contact table/entity with an additional column/field, “Last Name”, as it is a required column/field in my solutions.

Changes can take up to 6 hours to reflect in the mobile application.